Travelogue: Carbone and their legendary Spicy Rigatoni

If you watch Chrissy Teigan’s Snapchat as religiously as I do, you know all about the year’s it-restaurant Carbone. Located in both NYC and Vegas, the restaurant feels straight out of the Sinatra and Godfather era, complete with red velvet draping, bourgie chandeliers, low lights, bow tied waiters, and damn good Italian food. Alex and I were in Vegas last December and obvi I had to check it out.

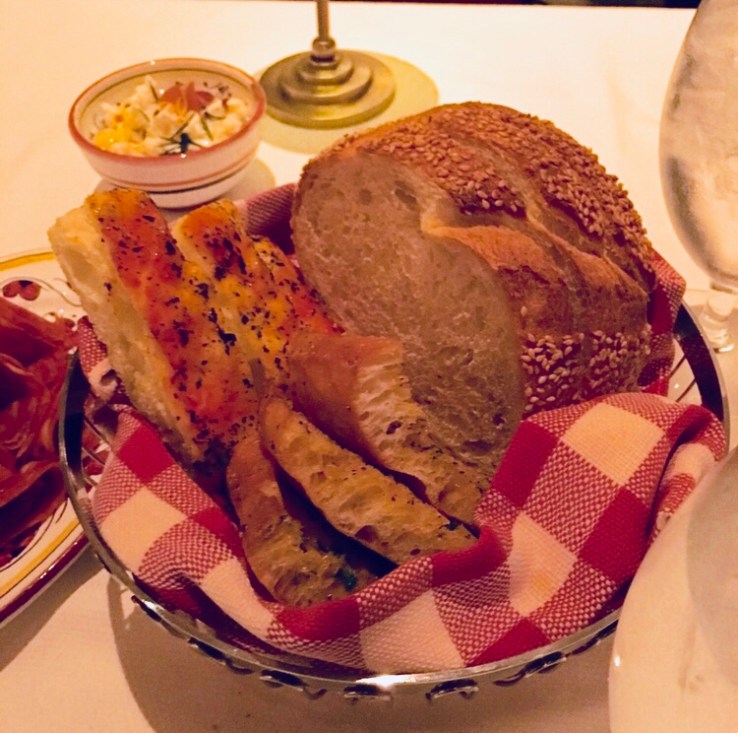
The maitre d’ seated us at a secluded booth, and we had barely put in our drink order before a guy came buy and sliced us a generous hunk of parmigiano-reggiano as an amuse bouche. Any opportunity to eat a hunk of the good stuff should NEVER be passed up. Next they brought our their complimentary antipasti spread. It included cauliflower giardiniera, salami, prosciutto, a couple different kind of cheese, and three kinds of bread. Everything was awesome and went great with the negroni I ordered, but oh man–the tomato bread was our FAVORITE. The waiter ended up bringing us 2 refills of just that. I mean we were probably starved after walking around Vegas all day and guzzling apertifs, but still it was crazy good.

carbone

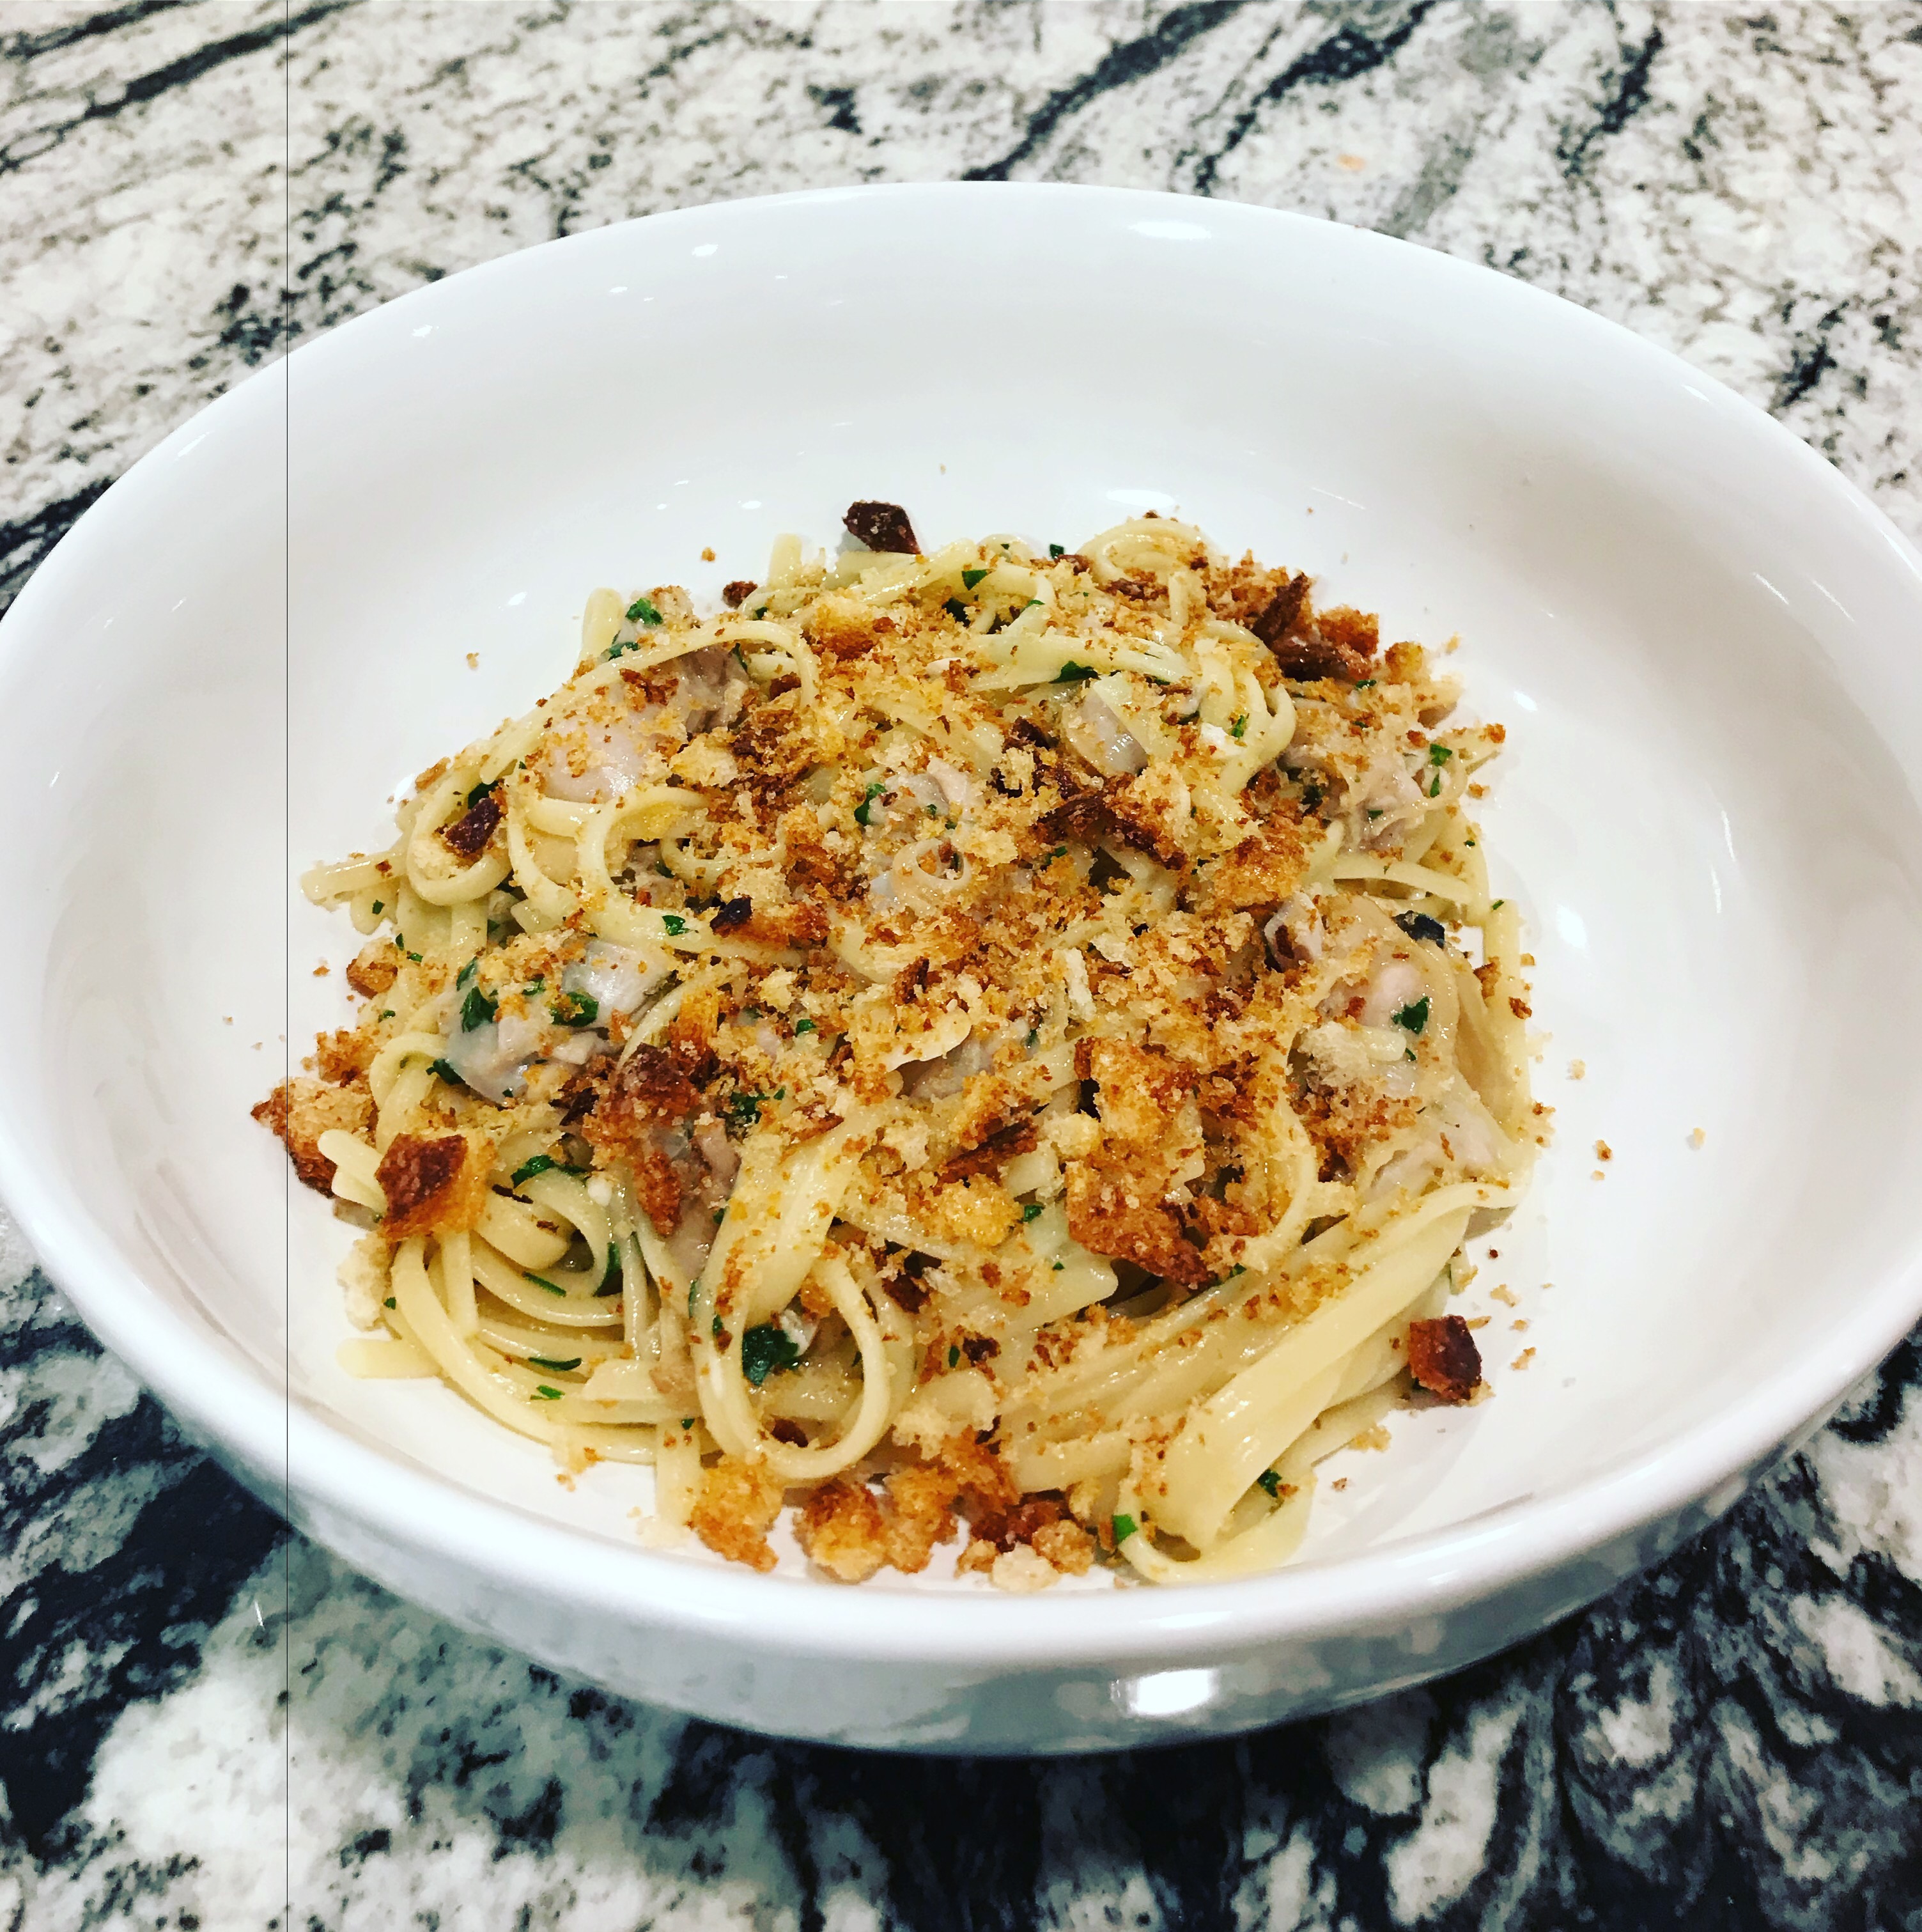
For the pasta course, we ordered pasta alle Vongole and Carbone’s signature spicy rigatoni alle vodka. The pasta with clams was good, but nothing to write home about…sorry not sorry, I dig my version with sourdough bread crumbs more. But the rigatoni, dayyyymn son!! Alex and I are every last bite and wiped up all the sauce with our bread. For such a humble concept, it was a perfectly executed exquisite dish. More on that in a bit.

As a main course, Alex and I shared the cherry pepper ribs. They were ENORMOUS–like, we both could only eat one rib kind of big–but the meat was fall off the bone tender and glazed in a spicy, sweet, and tangy sauce. It took every ounce of self control I had not to pick the rib up and bite into it like a cavewoman. It was served with a light and lemony side salad that balanced out the rich meat.

For dessert, they served us complimentary petit fours and an entire bottle of house-made limoncello that Alex and I were too full to even drink one glass of. I thought that was a really cool way to end the meal though, especially if you were on your way to XS or Hakkassan and needed to get a good buzz going. The meal was a splurge, but I felt like we really got our money’s worth with the appetizers, dessert, and last cocktail all baked in. Next time we go back to Vegas, you betcha we’re going back.

But back to dat magical spicy rigatoni. I went right to work replicating this dish, which turned out to be pretty simple. The heat in it is interesting–because of the rich butter and creamy half and half, the spice is a bit delayed and builds as you chow down. Let the simple flavors of tomatoes, crushed red pepper, and aromatics sing and you really can’t go wrong.

Spicy Rigatoni Alla Vodka (Carbone Copy Cat)

You’ll Need

  • 1 lb of rigatoni pasta. The dry stuff from the grocery store is cool, but I’m extra AF and used the freshly made kind I got last week at the Boston Public Market. SO good.
  • A 28 ounce can of whole peeled San Marzano tomatoes. You there, yeah you, pony up for the good stuff.
  • 1 large onion
  • 3 cloves of garlic
  • 1 teaspoon of crushed red pepper. Yep, the kind you sprinkle over pizza. Use half a teaspoon if you’re a wimp.
  • 1 shot of vodka. Ehh, 2 shots so you can drink one while you work. Salud!
  • 3 tablespoons of half and half
  • 1 tablespoon of butter
  • Kosher salt
  • Olive oil
  • Parmigiano or pecorino cheese. Not the shaker. Grate it fresh like the big kid you are.

Method

  1. Peel and dice up your onion. Throw it in a large sauté or sauce pan with a few generous glugs of olive oil. Over medium heat, let the onion cook down for about 4-5 minutes. Add the red pepper flakes and peeled whole garlic cloves, give it a good stir, then let the whole thing cook down for another 4-5 minutes. (So the real Carbone makes supposedly makes their sauce with an onion soubise base, but that requires several extra steps that I find unnecessary for a sauce where onions aren’t the star. Take this shortcut, feel good about it.)
  2. Add the entire can of tomatoes, the shot of vodka, and a couple generous dashes of salt. Vodka…weird right? So what the vodka does is lessen the acidic bite of the tomatoes, making their flavor cleaner, sweeter, and more mild. The butter and cream will have a similar effect to the tomatoes, coming together to make a luscious sexy sauce you’re going to love. (Again, supposedly Carbone doesn’t use vodka in their sauce, but this is a great substitute that mimics the mellow creamy onion soubise step we’re cutting out. Trust!)
  3. Let the sauce simmer on medium-low for 20-30 minutes.
  4. Meanwhile, bring a large pasta pot of water to a rolling boil and add several generous dashes of salt. Cook your pasta to al dente, the shortest recommended time. This leaves a nice bite in your pasta, keeping it tasting fresh and pleasantly chewy. Seriously keep your soft noodles Olive Garden, get that ish away from me stat. Drain those bad boys, reserving a splash (1/4 cup ish) of the starchy pasta water it was cooked in.
  5. Once your sauce has simmered for a good 20-30 minutes, take it off the burner and let it cool for a few minutes. Transfer the sauce to a blender, and add the butter and half and half. Put the lid on the blender, then wrap your hand down with a towel and hold the lid down as you blend your sauce up til it’s smooth. (The hot sauce ups the chance of the lid flying off due to steam build up. Hot tomato sauce all over your kitchen and person = BAD). Taste and add more salt if needed. Splash in a bit of the pasta water if your sauce looks like it needs more liquid.
  6. Toss the pasta in a big bowl with plenty of sauce. Serve in shallow bowls with fresh grated parmigiano and a drizzle of expensive olive oil on top.

Remix The Dish: Add a sliced chicken breast and plop the pasta onto a bed of wilted spinach for a complete meal. The spicy sauce is a great base and would taste awesome on veggies or fish. I bet it’s divine on those fried chicken cutlets from Whole Foods too!

*Some of these pictures are taken from Google. My iPhone pics didn’t turn out awesome in the low lighting. Deal with it bruh.

The one where we make Lobster Rolls

Everyone knows the best week in Tulsa is lobster roll week at Trencher’s. The 40 person line and curt man who used to work at the register are well worth that first bite: warm bread that’s both crispy and delightfully soft; the smell of fresh lobster hits your nose at the same time the sweet salinity hits your tongue; mayo so light you don’t even know it’s there. Perfect lobster rolls in Oklahoma–they can be done!

So I know I know, lobster isn’t exactly a budget friendly item. No shame in po’ boying it with shrimp or the frozen langoustines you can buy at Trader Joe’s. My bourgie ass has just GOTSTA splurge every now and then though.

Now, I’m not a mayo person. But the mayo is crucial in this recipe–trust me, it keeps the lobster light and succulent. It holds the salad together and keeps it from getting watery and gross. The salad won’t be creamy at all–just fresh!

Believe it or not, I nabbed this recipe from a restaurant in Minneapolis (!!) called the Smack Shack. I ate there for dinner one night and loved it, then was thrilled to see the place again at the airport. It was 9:30 am and I got a lobster roll anyway. Foodie for lyfe.

You’ll Need:

  • 2 live Maine lobsters
  • JK! You think I have the stomach for throwing breathing living things into a pot of boiling water while they scream in agony? Fuck that. Also, de-shelling is just not my forte.
  • Okay for real now. About 1-1.5 lbs of frozen lobster meat, thawed. THE GOOD STUFF. The kind of stuff you have to get from Bodean’s or an actual fish monger. I wouldn’t trust anything from Target or Sam’s.
  • A clamshell of tarragon
  • A cucumber
  • Mayonnaise. Don’t even THINK about using Miracle Whip, it’s disgusting. Don’t try to save calories by using Greek yogurt either, the taste is way too strong and is an unforgivable sin against that delicate and delicious lobster meat.
  • Kosher salt and fresh cracked black pepper
  • Butter lettuce or arugula
  • Oil spray or softened butter
  • Brioche buns. Or milk bread if you know where to find any.
  • Lemon, for garnish

Method

  1. Preheat your oven to 400 degrees Fahrenheit. Split your buns down the top and gently pry them open a bit…you want that surface area, baybee! Spritz with oil or slather with some softened butter.
  2. Take your thawed lobster meat and let it drain in a colander. You want the meat to be dry-ish before mixing it with the other ingredients.
  3. While the oven is heating and lobster is draining, peel and de-seed your cucumber, the finely dice about half of a cup. Gently pull about half of the tarragon from their stems and chop up those leaves too.
  4. Take a paper towel and gently press down on the lobster, absorbing the last bit of excess moisture. Dump onto a cutting board and give it a quick chop, breaking up any large pieces but still leaving lots of texture. Toss in a bowl with the cucumber, tarragon, and 1/4 cup of mayo. Taste, then add salt and pepper to your liking. Set aside in the fridge to let the flavors meld.
  5. Toast your brioche buns in the oven for 7-8 minutes, until they’re golden, crisp on the surface but soft underneath.
  6. To assemble, gently open the buns and add a thin layer of butter lettuce or arugula. Top with a generous serving of the lobster salad. Squeeze a little lemon on top. Try not to cram the whole thing into your mouth at once.

Remix The Dish: The lobster salad will taste just as awesome the next day after the tarragon really sets in. I’m extra AF and plan on eating it in butter lettuce wraps for lunch the next couple days at work! For a more traditional take, use parsley and celery instead of tarragon and cucumbers.

Mushroom Steel Cut Oat Risotto

This is a dish I’ve had in the back of my mind for years now. I’d read that you could treat some starches other than arborio rice just like you would a risotto–farro, barley, even brunoised (finely diced) potatoes. Alex and I were staying at a hotel in Cancun called Live Aqua, where Michelle Bernstein has a restaurant and featured a savory steel cut oat risotto. I tried it for the first time and loved it. It was rich and cheesy, perfectly paired with melt in your mouth osso bucco and bright pickled fennel.

Last month I went to Empire State South while in Atlanta on a business trip, and Hugh Acheson’s rendition of steel cut oat risotto was truly something special. The umami-rich mushrooms contrasted with bright green basil oil, and an acidic element added depth and tied the whole thing together. This is my attempt to recreate that magic.

You’ll Need

  • 1 container of mushrooms–baby bellas, shiitakes, or something fancier if you have access to them
  • 1 clamshell of dried porcini mushrooms–about 1/3 of a cup
  • 3/4 a cup of steel cut oats
  • 1/2 a cup of white wine
  • Granulated garlic
  • 1/2 a cup of fresh grated good parmiggiano, plus more for garnishing
  • A palmful of chopped tarragon
  • Tarragon, balsamic, or red wine vinegar
  • Olive oil
  • Kosher salt
  • Chives for garnish

Method

  1. Start by boiling 3 cups of water, then add the dried porcinis. This will steep and produce a very dark, umami-rich liquid. This will be the flavor base of the dish. Trust.
  2. Preheat the oven to 400 degrees F. Rinse the mushrooms really well in a colander, toss with a pinch of salt and a drizzle of olive oil, then roast on a sheet pan for about 35-40 minutes, tossing halfway through and checking to make sure the mushrooms don’t dry up too much. The mushrooms should release a lot of their liquid and concentrate in flavor. They’ll taste awesome. Remove and let cool slightly. We’ll use these to top the risotto at the end, so if you want to do this a day in advance, that’s totally cool. I run a very laissez-faire kitchen up in here.
  3. While your mushrooms are roasting, do your prep work–chop your herbs, grate your parmiggiano, measure out your wine, get all of your ingredients out where you can easily access them. Once the cooking process starts, you won’t be able to leave your station for too long. Nuke the porcini mushroom liquid for 2 minutes so it’ll be warm and ready to go.
  4. To start the risotto, get a large flat-bottomed pan (a sauté pan or frying pan that’s a couple inches deep will work well). Drizzle in some olive oil, and heat over medium. Once warm, pour in the steel cut oats and let them toast. Stir the oats constantly and don’t let them burn–this step is over once you can smell their nuttiness, about 30 seconds later. Pour in the white wine and give it a good stir, then turn the heat down to medium low. Add a couple big pinches of salt and a generous pinch of granulated garlic. Stir with a wooden spoon every 15 seconds or so, and let the oats absorb the liquid.
  5. For the next 25 minutes or so, this is your job: splash in 1/4-1/2 a cup of porcini broth into the oats, and stir and stir until the oats absorb much of the liquid. Once the liquid mostly dries up, add some more. Your oats should always be veiled under a thin layer of liquid, and you should stir it constantly to make sure everything cooks evenly, doesn’t burn, and that the excess starches get creamy and delicious. It’s a labor of love, but you’ll be so glad you put in the hustle.
  6. Once all the broth is used up, taste the oats. They should be hearty and toothsome, but not unpleasantly hard. Add warm water and continue cooking if it needs more time. If not, cut the heat and stir in the parmiggiano, tarragon, and a splash of the vinegar. Taste, then add more salt if needed.
  7. To serve, spoon into a wide bowl. Top with the roasted mushrooms, the chives, fresh grated parmiggiano, and a drizzle of good olive oil. Try not to wolf it down too quickly.

Remix The Dish: You can use this same method with chicken, beef, or veggie broth if mushrooms aren’t your thing and still get a crazy delicious meal. Chicken broth topped with roasted asparagus and bright green basil oil with be a super sexy spring dish. Next time, I’m going to double this recipe and eat the leftovers for breakfast with a 7 minute egg.

Guinness Beef Stew with Parmesan Dumplings

Despite the ridiculously warm weather, I’ve been in the mood for rich comforting winter foods. Having only tried dumplings at Cracker Barrel, I thought I wasn’t a fan–those dense, doughy masses just weren’t my jam. It’s only been about 5 years since I learned about the fluffy, cloud-like biscuit dumplings I’d been missing out on my whole life. Obvi, I have a LOT of stolen time to make up for.

Jamie Oliver gave me the idea to combine rich Guinness with the acidic and savory taste of Parmesan. I got the dumpling methodology from none other than the Pioneer Woman–adding cornmeal to keep the dumplings light and un-gluey is truly a stroke of genius.

You’ll Need:

  • 1 styrofoam package of stew meat (or skip step 1 and use leftover pot roast or brisket)
  • 2 tablespoons of flour (don’t do this is you’re using leftovers)
  • 1 cup of thawed frozen pearl onions (or one large onion, diced
  • 3 carrots, peeled and cut into 1 inch oblong pieces
  • 1 1/2 cups of pee wee potatoes or baby potatoes, halved
  • 1 bottle of Guinness or another stout beer or a porter
  • 3 cups of beef stock
  • 1 tablespoon of tomato paste
  • 1 tablespoon of soy sauce (trust)
  • 1/2 a teaspoon of garlic powder (or 2 cloves, minced)
  • 1 teaspoon of dried oregano
  • Kosher salt
  • Pepper
  • 3/4 cup of all purpose flour
  • 1/4 cup of cornmeal
  • 1/3 cup of grated or shredded Parmesan (not the gross stuff out of a green shaker)
  • 1/2 heaping tablespoon of baking powder
  • 3/4 cup of half and half
  • Kosher salt
  • Oil
  • Chopped parsley

Method

  1. Toss the stew meat with the flour and a few big dashes of kosher salt. Heat a couple tablespoons of oil in a large heavy-bottomed pot or dutch oven over medium heat. Place half the meat (discard the excess flour and salt) and let it sear for a minute or two before flipping over to sear on the other side. Use a slotted spoon to remove the meat and seat aside on a plate. Repeat with the remaining meat. The pot is going to have all kinds of browned bits stuck to its bottom. This is good, VERY GOOD. Do not wash the pan before the next step. Trust!
  2. Add the onions and carrots to the pot and let the veggies sauté for 5-6 minutes. The onions should be soft and the carrots should have a little color. Now we gon’ get fancy AF and do a little something they call DEGLAZING. To deglaze, you pour flavorful liquid into a pan and use a wooden spoon or a whisk to scrape up all the brown bits from the bottom of the pan, letting them dissolve into the liquid. This is where SO MUCH of your flavor comes from–it’s how people make delicious things like pan sauces. So go ahead and pour your whole bottle of Guinness into your pot and scrape away!
  3. Add beef stock, tomato paste, soy sauce, garlic, and oregano, whisking so it all comes together. Add the meat and any accumulated juices back in the pot, then stir in the potatoes, a few dashes of kosher salt, and 10-15 cranks of fresh ground pepper. Bring to a boil, then reduce to low heat. Cover and let simmer for about 35 minutes.
  4. While the stew is stewing, whisk the flour, cornmeal, a dash of kosher salt, parmesan, and the baking powder together. Stir in the half and half until it’s incorporated into a wet dough.
  5. Once the 35 minutes are up, open the lid a tad and taste the potatoes and meat to make sure they’re both cooked through and tender. Taste the broth too, and add salt or more pepper if needed. Remove the lid and use a tablespoon to quickly dollop big blobs of the dumpling dough directly on top of the stew. They’ll sink a bit, and it’ll look messy and gross and you’ll want to freak out on me for ruining a pot of perfectly good pot of food. Don’t. Trust ya girl, k?! Put the lid 90% of the way back on, and let it simmer on low for 15 minutes.
  6. Take the lid off. Holy shit, those gross blobs of wet dough have turned into delicious puffy white clouds!!! Let the stew sit for about 10 minutes so the dumplings can cool off a bit and set before serving. The stew will have thickened into a savory gravy that coats the meat and veggies and is a match made in heaven with the soft and bread-y dumplings. This really is the ultimate comfort food. Garnish with the parsley and Instagram that ish.

Remix The Dish: Believe it or not, these dumpling hold up surprisingly well as leftovers! Miraculously, they don’t get overly soggy or anything for the first couple days. As mentioned before, this is one of my favorite ways to repurpose leftover pot roast. This dish tastes AMAZING with chicken too–swap out a shredded roto chicken for the beef, the beer for a cup of apple juice, beef stock for chicken stock, and instead of soy sauce, stir in 1/2 a teaspoon of turmeric.

Pasta alle Vongole (Linguini with Clams)


I’m reading this book called Salt Acid Fat Heat right now and holy hell…if you have any interest in ever getting “off the book” and acquiring the ability to invent recipes on your own, this a great place to start. It teaches that cooking is all about mastering four key elements–salt, acid, fat, and heat–and shows how great dishes all stem from controlling those factors.

Throughout the book, the author Samin Nosrat refers to common dishes over and over to illustrate how these four key elements play off each other to create familiar flavor profiles we all love. Peanut butter and jelly, grilled cheese and tomato soup, and wedge salads are all frequently mentioned along with Pasta alle Vongole, a bright umami-rich pasta dish that’s really pretty simple considering its “wow” factor. I made this a few days ago and I’m still dreaming of that fresh perfect bowl.

The layers of wine, clam juice, lemon juice, and a hint of good cheese create a briny dish that’s elegantly balanced by bright acidity. The crushed red pepper adds depth, and parsley adds freshness. Don’t skip the sourdough breadcrumbs–they provide a textural element, as well as an extra tangy note. Plus they end up soaking up the sauce and tasting delicious, which ya know you don’t want to miss out on.

Adapted from Samin Nosrat. Serves 2 hungry people, with leftovers.

You’ll Need

  • 12 large or 24 small clams. Buy them the day you plan on using them!
  • 3/4 cup of white wine
  • 3 cloves of garlic, minced
  • 1 bunch of parsley, minced
  • A small palmful of crushed red pepper flakes
  • Juice of 1/2 a large or one small lemon
  • 2 tablespoons of butter
  • 1/4 cup of really good parmegiano or pecorino. Fresh stuff, not the garbage in the green shaker.
  • 1/2 a package of linguini
  • 2-3 slices of sourdough bread, toasted til brown and smashed to crumbs
  • Olive oil
  • Kosher salt

Method

  1.  First thang first, get a large pot of generously salted pasta water on the boil. The most difficult part of this dish is juggling the time, so you want to make when you drop your pasta in to cook a non-issue. Do your other prep work now too–mince your parsley and garlic, toasts and smash your breadcrumbs, get the butter, cheese, and red pepper flakes out and ready to go.
  2. Gently scrub the clams with a vegetable brush under cold water and rinse thoroughly. In a large saute pan, bring the white wine up to a boil, then reduce to medium high heat. Gently lay half the clams in the wine, cover the pan, and let the clams steam until they open, about 3-4 minutes. Remove the clams, letting the clam juice drain back into the pan for each one, and set in a bowl to cool down. Discard any clams that don’t open within 6 minutes. Repeat with the other half of the clams. The leftover steaming liquid is the entire crux of this recipe…if it has a greenish or blueish tint, don’t freak out, its cool. Pour all of the leftover liquid from the saute pan into a large bowl and set aside. It’s going to be the base of our sauce.
  3. If you’re using large clams, let them cool for a few minutes then gently remove them from their shells and slice into three or four pieces. Clams are one of those things that you really just want a small ladybite of. Discard the shells but keep the accumulated juices in the bowl. Add the clam meat back to the bowl and set aside. NOTE: you can skip this step if you’re using small clams.
  4. Alright, things are about to heat up. Drop your pasta in the boiling water and let it cook for 2 minutes less than the al dente time recommendation. My package said 8 minutes, so I cooked it for 6. Before you drain your pasta, use a ladle or carefully pour about a cup of the starch-rich pasta water to a coffee mug or measuring cup. This step is important, don’t mess it up.
  5. While your pasta is cooking, heat a couple tablespoons of olive oil, the crushed red pepper, and the minced garlic to your saute pan over medium low heat and let it bubble and infuse for 3-4 minutes. Keep a close eye on this! Don’t let the garlic brown. Your house should smell awesome right now. Add the wine/clam steaming liquid broth back into your sautee pan and crank the heat to high.
  6. Once the broth starts to bubble, add the par-cooked pasta and turn the heat down to medium while gently tossing the pasta. Add a splash of the pasta water and the butter, and let the whole thing cook down for about 2 minutes. The pasta will absorb the delicious broth while simultaneously thickening it into a light sauce, that should surround every noodle equally. If the pasta looks dry, add a bit more pasta water and let it continue to do its thang. The noodles should look very slippery and well lubricated, but not drowning in broth.
  7. Take the pan off the heat. Add the lemon juice, cheese, parsley, and clam pieces/any accumulated juices, and toss until its all well distributed. Taste and add salt if its needed—but between the salted pasta water, the clam broth, and the cheese, you should probably be good. Serve with a generous handful of breadcrumbs and a drizzle of olive oil.

Remix The Dish: If you’re cooking for a picky eater, portion out their pasta before you mix the clam pieces back in the pasta. Believe it or not, the tangy and umami-rich pasta tastes A LOT like a Caesar salad, and pairs well with chicken as its protein instead. My husband HATES seafood but ate his entire bowl with chicken on top. You could also make this dish with mussels–add a pinch of saffron to the steaming broth, and stir in fresh dices tomatoes with the butter and cheese.


Sausage and Peppers with Rice Grits


IT’S FINALLY COLD OUTSIDE. Hearty comforting foods are my favorite to both cook and eat, and the time is right for them. This New England meets New Orleans dish is wildly simple yet develops a ton of flavor within a short period of time. Basically, it’s the perfect weeknight meal.

I came up with it on the fly one evening, but next time I plan on doing all the prep work in the morning (steps 1 and 2) then finishing it up at dinner time. The onions and peppers cook down into a sweet jammy kind of relish that perfectly compliments the smokey and savory sausage. I added shrimp for me and leftover chicken for Alex to boost the nutritional value of the meal because we’re workout fiends, but that’s totally optional.

I was first introduced to rice grits at Tom Colicchio’s Craft Bar in NYC a few months ago, and they’ve quickly become a pantry staple. They cook up way faster than regular rice or corn grits, but offer the same starchy base perfect for absorbing flavors and filling your belly. You can buy them on Amazon, but since they’re expensive I opt to grind the rice myself at home. This way I have an endless supply.

You’ll Need:

For the Sausage and Peppers:

  • 1 package of kielbasa (one really long link is how they come at my grocery store)
  • 2 small or 1 large onion
  • 1 large red bell pepper
  • 1 large yellow bell pepper
  • Kosher Salt
  • Olive Oil
  • Optional: Fresh or thawed shelled and de-veined shrimp (I use Trader Joe’s Argentinian Red Shrimp, high quality and they always smell super fresh). You could also add in leftover or rotisserie chicken if you’re feeling it.
  • Optional: Green onions or parsley for garnish

For the Rice Grits:

  • 2 cups of dry jasmine rice
  • 1 tablespoon of butter
  • Kosher Salt

Method:

  1. We’ll start with the prep work. Lop off both ends of the onion and slice in half from top to bottom. Peel off the skin and turn each half on their side, then slice into thin half moons. For the bell peppers, carefully insert your knife on the top of the pepper and cut a circle around the stem, close to the edge of the bell pepper. Remove the stem and seeds, then cut the peppers in half from top to bottom. From there, remove the white pith with a paring knife and any rogue seeds, then slice longways so you have long strips, like you’re going to make fajitas. For the Kielbasa, remove it from the packaging and slice them into thin oblong pieces. If you’re doing your prep work in the morning, toss the veggies and meat in two separate ziploc bags and throw them in the fridge til you’re read to cook.
  2. For the rice grits, put the uncooked jasmine rice into a freezer bag and squeeze all the excess air out. Spread it in a thin layer across the bag, then put in in the freezer for 30 minutes. This step makes the rice brittle, and is crucial to get the rice to break up in smaller bits. Remove the rice from the freezer and pour into a food processor. Cover the top (seriously, unless you want white powder all over your kitchen) and process on high for about 4-5 minutes, stopping every minute or so to check out the size of the granules. You want the rice to look like it’s been broken into halves or thirds, NOT completely pulverized. Store in Mason jar until you’re ready to use the rice. It’ll keep forever in the pantry, just be sure to store it in a jar or a plastic sealed container to keep out pantry flies.
  3. Put the largest skillet you have over medium heat with about a tablespoon of olive oil, and add the onions and sausage. Let it all brown and cook down for about 5 minutes before you add the bell peppers and a pinch of kosher salt. Turn the heat down to medium low, and let the whole thing cook down for about 30-35 minutes, stirring every 5 minutes to make sure everything is cooked evenly. The veg will melt into a sweet jammy relish, it’s the best part! But I suppose if you like your veggies to have more body to them, you can take it off the heat after 20 minutes or so. This is a pretty laissez-faire kind of cooking blog. In the last 10 minute of cooking, add in the shrimp, stirring every few minutes to make sure they’re cooked through. If you’re using cooked leftover or rotisserie chicken, add it in the last few minutes to heat it through.
  4. Meanwhile, measure out a cup of the rice grits and pour it into a sieve. Run it under water, swishing it around with your hands to remove all the powdery white starches. This step is important! Too much leftover pulverized rice will make your grits overly gummy. Save the rest of the rice grits for next time.
  5. Bring the rice grits and 2 cups of water to a boil. It’ll happen sooner than you think, so ya know, hang out by the stove. Stir and turn down to low, and stir in about 1/8-1/4 of a cup of water every time the rice absorbs all the water (so probably every few minutes). Cook for about 15 minute, or until the rice grits are soft to taste with no hard center. Remove from the heat, and fold in the butter and a pinch of salt.
  6. To serve, lay a bed of rice grits in a plate or a bowl. Spoon the delicious sausage and peppers on top. Garnish with green onions or parsley.

Remix The Dish: Use the leftover sausage and peppers on a sandwich, on top of scrambled eggs or mixed with potatoes and fried like a hash. The rice grits remind me of congee, a traditional rice porridge, so I like to eat it how my mom would for breakfast with a fried egg, soy sauce, chili oil, and some fresh green onions. It would taste bomb with anything stew-y and rich though, like pot roast, short ribs, or pretty much anything made in the crock pot.


Aglio e Olio–Lightened Up!


If you haven’t seen the movie Chef, drop what you’re doing and catch it on Netflix STAT. It is definitely in my top 10 all time favorites films, Jon Favreau’s passion project which he wrote, directed, and starred in. Chef is a redemption tale of a man trying to reclaim his voice in the kitchen, and finds his way back to his family in the process.

It’s a road movie filled with plenty of funny and charming moments, but (as I’m sure you can guess) the food is just to die for. Jon Favreau manages to capture the heart behind food, whether it’s whipping up gourmet grilled cheese for a child you love, the creative process that happens in the kitchen, the sensuality of feeding your partner on a sexy date night, or going back to an old recipe from the happiest time in your life. One of the food-porniest moments of the film happens when Jon Favreau makes a skillet full of Aglio e Olio (pasta with olive oil and garlic) for Scarlett Johansson, and holy hell so they make it look delicious. (Trust me, this movie clip is everything).

Celeb chef (and you know, The Godfather of modern day food trucks) Roy Choi wrote all the recipes for this movie, and let’s just say the one for his Aglio e Olio is…indulgent. Like, an entire cup of olive oil kind of generous. Considering it’s a Tuesday night, that kind of richness just isn’t going to fly. My trick is to stretch the olive oil by incorporating the starchy water that the pasta boiled in–it thickens up into a light sauce that evenly coats every noodle. Have it ready on your kitchen table in 20 minutes flat.

You’ll Need

  • About 1/2 a package of pasta (any kind will do but there’s something extra satisfying about slurping angel hair or linguini. Today, I used orrichiette!)
  • 2 tablespoons of good olive oil
  • 4-5 cloves garlic, sliced as thin as you can. Like razor-blade-Goodfellas thin.
  • 1/2 a teaspoon of red pepper flakes
  • Zest of 1 lemon
  • Juice of 1/2 a lemon (be sure to zest it first, duh!!
  • Kosher salt
  • 2 fists full of flat leaf parsley, finely chopped
  • 4 cups of greens, rough chopped (optional, but a great way to  sneak some good nutrition and fiber into this indulgent dish. I used pea tendrils because that’s what I picked up at the farmer’s market, but spinach, arugula, or Swiss chard is good)
  • 1/2 cup of Parmesan or pecorino
  • A handful of breadcrumbs (optional, but adds a nice textural element. Don’t use the gross bread crumbs that come from the aisle in a grocery store either–toast up a couple slices of French bread or some rolls, or bust out some crostinis and crunch them up with your fingers)

Method

  1. Cook your pasta in salted water according to the instructions on the package, by subtract a minute from the shortest suggested cooking time. You want this pasta al dente…mushy noodles are gross. Plus, it’s going to cook again in a skillet later, and you don’t want them to overcook.
  2. While waiting on your pasta to cook, slice up your garlic, chop your parsley and greens, and zest your lemon.
  3. Before draining your pasta, pour 1/2-3/4s of a cup of the starchy pasta water into a heat-proof measuring cup or a bowl. Dump the pasta into a colander.
  4. Heat the olive oil in a skillet on medium heat, and add the garlic slices and red pepper flakes. Let cook until aromatic but not scorched, about 3 minutes. Keep an eye on it!! As soon as you see the edges of the garlic start to brown, add the pasta water. Let the sauce boil and thicken for about 2 minutes.
  5. Add the pasta, greens, parsley, and a dash of salt in the skillet, and toss until the greens have softened. Add the lemon juice and cheese, and toss again, tasting to see if it needs more salt or red pepper.
  6. Serve garnished with bread crumbs. Delish!!

Remix The Dish: this pasta is pretty much a blank canvas, so toss it with anything you have in your fridge. Leftover chicken, steak,  or shrimp, roasted veggies, or leftover diced crudité would all taste great.

Spicy Thai Steak Salad with Crispy Pot Rice


I know I know, it’s been a few. Between work trips, planning my high school reunion, some big life changes, then a super clutch vacation, it’s been a little hectic in the Triniwood house. 

I’m a total kitchen dork though, so most of my time laying by the pool was spent reading Grant Achetz and Eric Ripert’s memoirs, and some cookbooks. I couldn’t wait to get home and do what I love again. 

This recipe was adapted from Food52’s A New Way To Dinner. This cookbook is one of my favorites I’ve read in awhile–all about how to repurpose a big batch of food you make on Sunday throughout the week, which (hello) is the whole thesis of this blog. The PERFECT dish for a hot summer day like today was. A key feature of Thai cuisine is that it incorporates all taste sensations–salty, sweet, sour, spicy, and savory. And this dish more than delivers on all fronts. Alex told me that he would “totally order it from a restaurant,” which was probably the weirdest compliment I’ve ever gotten.

You’ll Need:

Thai Beef Salad

  • Flank steak (also called London Broil, Top Sirloin’s good too)
  • 5 cloves of garlic
  • 1-2 red Thai chiles, seeded and stemmed (a habanero or a Serrano would work too)
  • 2 tablespoons of sugar (I used sugar in the raw)
  • Juice of 2 limes
  • 1/3 cup of fish sauce (Don’t be scared. It’s delicious! Find it in the Asian section of the grocery store. Soy sauce would work too)
  • 1 small sweet onion, thinly sliced into half moons
  • 2 scallions, sliced
  • A big handful of cilantro and/or basil, rough chopped
  • Kosher salt
  • Arugula, romaine, or spring mix

Crispy Pot Rice

  • 2 1/2 cups of basmati rice, rinsed and drained (the skinny delicious kind you see at India and Mediterranean restaurants. Look in your grocery’s Asian or bulk sections)
  • 1/3 a cup of plain yogurt (ehhh who even has plain yogurt, just use Greek yogurt thinned out with a splash of water)
  • 5 tablespoons of cooking oil
  • Kosher salt
  • Juice of 1/2 a lemon

Method

  1. Pat the steak dry with paper towels and lay it out on the plate on a counter so it comes to room temperature while you cook. This is weird, but we aren’t going to season this steak before cooking (!!!). Flank steaks are relatively thin and usually cook through by the time you get a good crust. Instead of rubbing a bunch of moist flavoring on the steak before we cook (which inhibits browning and carmelization) we’re gonna cook it naked and season after. It’s crazy. You’re gonna have to trust me.
  2. Use a mortar and pestle, a mini food processor, or a spice grinder to turn the garlic, chiles, and sugar into a paste. Place it in a large bowl with the lime juice, fish sauce, and salt. Taste and add more salt if needed or a splash of vinegar if you need more acidity. Toss in the cilantro/basil, scallions, and onions.
  3. Bring a large pot of salted water to a rolling boil then add the basmati rice. Reduce the temp to where it’s still actively simmering, give it a good stir, and let it cook for about 5-7 minutes. Drain in a fine colander, then pour in a bowl and mix with the yogurt, 3 tablespoons of oil, and a couple dashes of salt. Taste and add more salt if needed. The rice should be pretty close to tasting “done,” soft and not too toothesome.
  4. While the rice is getting started, turn your oven on a high broil and move your rack to the highest position. If you have a meat thermometer, insert in the thickest part of the steak. Put the steak on a pan and place directly under the broiler, cooking for 3 minutes per side or until the thermometer reads 130 degrees. Let the steak rest for 10 minutes, then slice against the grain. This part’s important—the steak will be too chewy if you cut along the muscle. Toss the steak with the salad and let it set on the counter while the rice finishes, so the flavors can meld.
  5. Back to the rice. Heat 2 tablespoons of oil in a Dutch oven on medium high. Gently swirl the oil around them add the rice–you’ll hear it sizzle, so be careful to be gentle and not splatter oil on yourself! Use a spoon to spread the rice evenly and lightly pack down. Wrap the lid of the Dutch oven on a kitchen towel (this will absorb steam, keeping the rice from getting mushy) and cover the rice, careful to be sure no part of the the towel is touching the burner. Cook on medium high for 5 minutes, then reduce to low. Let cook for about 25 minutes, take off the heat, and let sit for another 5. Use a metal serving spoon or spatula to scrape every bit of the the crunchy brown rice off the bottom of the pot and toss around with the white rice. This is THE BEST part!! A nod to Hugh Acheson’s crispy rice I can’t stop talking about. I can never get enough crunchy rice.
  6. To assemble, plop a big scoop of rice on a plate along with some salad greens and some of the beef salad right on top. The spicy and acidic beef is going to taste so good with the savory rice, and the crunchy rice mixed throughout are just magic.

Remix The Dish: I plan on eating the salad all week as leftovers, on a baguette as a riff on a bahn mi sandwich. The rice goes with anything–it would taste amazing with stews, or maybe some sautéed greens and a fried egg for an easy dinner (or a weird breakfast I’d probably love).

Braised 5-Spice Lamb Shanks


Don’t freak out. You can do it!! Something I love about braising big meat is that it’s basically the same technique every time. Follow this method with chuck roast, short ribs, pork shoulder, or lamb shanks, and you’ll get that delicious fall-apart meat you can’t help but crave on cold Sunday nights. Yes I realize its currently 100 degrees outside, but lamb shanks were on sale at Sprouts and I’m not going to let an opportunity like that pass me by.

Here’s the basic steps home cooks need to remember for a clutch braise:

  1. Start with a hard sear. Get your frying pan or dutch oven ripping hot with about a tablespoon of oil, aggressively season your meat, then brown the meat on all sides. When you’re done, set it aside on a plate. See that brown stuff leftover in the pan? That right there is money! Loads of flavor packed into those little bits so DO NOT wash your pan.
  2. Add flavor elements. This is when you want to add your aromatics, veggies, tomato paste, spices, etc. Let them sweat, toast, and bloom, and allow for some more delicious browned goodness to stick to the bottom of the pan.
  3. Deglaze. This is most commonly done with wine, but beer, vinegar, or another flavored liquid may be used. Pour it right into your cooking vessel and use a wooden spoon to scrape the browned bits from the bottom of the pan. The browned bits (aka fond if we’re being fancy and cheffy) will dissolve into the cooking liquid and make everything flavorful.
  4. Low and slow cooking. Put the meat (and any accumulated juices) back in the cooking vessel and add enough broth so that the meat is about 80% of the way covered with liquid. Crack the heat up to high until its just boiling. From here, you have a few options. If it’s in a dutch oven, throw a lid on it and move to an oven set at 300-325 degrees F for around 2-4 hours (depending on what kind and how big your meat is). If you planned on using a slow cooker, transfer it over (carefully, that ish is hot!) and let it braise on low for around 8 hours. If you planned on using an Instant Pot/pressure cooker, well you should have done all the previous steps in the vessel itself, and now its time to pressure cook on high for 40 minutes or so.

Remember these steps. These are the basic fundamental techniques you can riff on. Today I spiced my lamb shanks with 5-Spice powder and ginger because I’ve been craving those flavors, but it easily converts to French, Italian, British, or Persian flavors. I’ll get to that part later.

You’ll Need

  • 3-5 lamb shanks, one per person plus enough for leftovers if that’s how you roll
  • Kosher salt
  • 2 tablespoons of Chinese 5-Spice
  • A small onion, diced 
  • A carrot, diced
  • A stalk of celery, diced
  • A clove of garlic, minced
  • A tablespoon of minced ginger or ginger paste
  • 1/2 a cup of whatever wine you have leftover in your fridge
  • 2 cups of chicken broth (or water and bullion cubes, whatever
  • 4-5 springs of fresh herbs, rosemary and thyme are good
  • Rice, pasta, mashed potatoes, couscous…whatever you want to soak up the yummy sauce

Method

  1. Preheat the oven to 325 degrees F. Throw the lamb shanks in a bowl and toss with the 5 Spice and several large pinches of salt. Put your dutch oven on medium high and drizzle in some oil. When the oil’s screaming hot, GENTLY place the meat in the pan with tongs. Sear on all sides (that means 4 sides, not 2) for 3 minutes or so per side, so there’s a nice brown caramelization (brown = flavor). Put the shanks on a plate and set aside.
  2. In the vessel that you seared the lamb in, lower the heat to medium and add the onions, carrots, and celery (hey, that’s called a mirepoix!). Let the veggies soften and sweat for 7-8 minutes. Add the garlic, ginger, and leftover 5 Spice powder you tossed with the lamb, and let it all toast for 3-4 more minutes, stirring constantly. There should be lots of crusty brown bits at the bottom of your pan. Your house smells awesome right now.
  3. Add wine to your pan, and use a wooden spoon to scrape the browned bits off the bottom of your pan. The liquid will make this super easy! (PS remember this little method next time you have a mess of a stubborn pan to clean–heat with a splash of water and go to work!). 
  4. Add the broth, herbs, lamb, and any accumulated juices back to the cooking vessel, and crank the heat until the liquid boils. Cut the heat, cover, and transfer to the oven. Check the meat after an hour and a half–you want it tender and falling off the bone. Remove the lid and let braise for 15-30 minutes longer. Let cool for at least 10 minutes before serving over your chosen starch, with the sauce and veggies drizzled on top.

Remix The Dish: there’s a million flavor profiles you can tack on to the shanks. Here’s a few ideas (for all of these, leave out the 5 Spice and ginger):

  • French – deglaze with red wine, up the amount of fresh herbs
  • Italian – saute tomato paste with the veg, deglaze with red or white wine, stir in plenty of dried or fresh oregano
  • British – deglaze with Guinness and stir in a couple tablespoons of Dijon mustard before simmering
  • Persian – dust the shanks with cinnamon, nutmeg, turmeric, and cardamom, deglaze with warm water steeped with saffron threads. Garnish with mint.


I made Persian shanks a few years ago and threw it up on instagram. The yellow hue comes from the turmeric and saffron. So money.

Grilled Pork Chops with Mustard Brussels Sprouts and Blueberry Gastrique

I kinda stumbled into this dish. I’ve been traveling and didn’t want a bag of blueberries I got in my farm bag to go to waste, so I started out making them into a syrup I could freeze and use for cocktails, desserts, or pancakes down the road. After I had it jarred and ready to go, I realized how awesome it would taste with the dinner I had whipped up. Boom roasted, an okay dinner into a clutch one with a simple good idea.

A gastrique is basically just a sweet and sour fruit sauce. This version is pretty basic (just a weeknight dinner) but you can fancy up the sauce with garlic, shallots, and herbs if you’re feeling it. The tangy sauce tasted great with the smokey pork chops, and the sweetness complimented the spicy mustard and vegetal Brussels sprouts. For a meal on the fly, it turned out super balanced!

You’ll Need:

  • Pork chops, thick cut
  • kosher salt
  • pepper
  • 4 tablespoons of course grain dijon mustard
  • 6 tablespoons of olive oil, plus some
  • 1 tablespoon of honey
  • 1 tablespoon of vinegar (red wine vinegar is my default, but apple cider or even white would do in a pinch)
  • A pint or so of blueberries
  • 3/4 cup or so of sugar
  • Lemon juice (the vinegar you used earlier would be fine if you don’t have a lemon)
  • Brussels sprouts (eyeball it…I used like 8 big ones for 2 portion sizes and still had some leftover)
  • Smoked turkey leg (crumbled bacon would be ideal, I just didn’t have any at the time. Or leave this out, totally not a necessary component. You can find these at most grocery stores near the bacon and sausage. They’re super cheap too!)

Method

  1. In a jar, shake together the mustard, olive oil, honey, and a pinch of salt. Salt and pepper both sides of your pork chops, and pour some of the dressing on top of the pork chops to marinade. You don’t need a ton, but enough so that all surfaces of the pork chops receive some lovin’. Leave on a plate to soak in the flavors while you work on the rest of the meal. Add the vinegar to the unused dressing and shake to combine. Set aside.
  2. Throw the berries and half a cup of water, and the sugar into a sauce pan. Bring to a boil, then use a potato masher to break up the berries and release their juices. Add a squeeze of lemon and a pinch of salt, then taste, taste, taste. Does it need more tang? Add more lemon. Is it too cloyingly sweet? Add another pinch of salt. Too thick? Splash in some water. If you’re feeling adventurous, add some fresh thyme or rosemary! Let bubble and thicken on low for 10-15 minutes, checking often to make sure you like the taste and consistency. If you want your fruit sauce chunky, use it as is. If you want it more homogeneous, toss into a blender. If you’re just nuts like I am, blend then pour it through a fine-mesh strainer. This will keep well in the fridge for a week or pretty much forever in the freezer.
  3. Trim the stalky bottom of the Brussels sprouts off and cut into quarters. Use a small knife and your hands to strip the meat the smoked turkey leg, and roughly chop the meat. You’ll have a ton extra, which I like to throw in a jar and freeze to use on other occasions such as this. I also freeze the leftover bone to make stock from, but I also realize that I’m kinda insane. Hashtag nose to tail.
  4. Turn your grill on medium high heat. While the grill is heating up, drizzle the bottom of a frying pan with some olive oil over medium heat and saute the Brussels, making sure they get some nice caramelization on them before stirring around so their opposite sides get some color. After a few minutes, toss in a handful of the smoked turkey.
  5.  Grill the pork chops 2-3 minutes on each side for some clutch grill marks, then move to indirect heat until they’re finished. Be sure to cut into one and check before serving…the only thing worse than overcooked pork is undercooked pork. If you’re using a termometer (you should) I like my pig around 155 degrees, but apparently new studied say 145 is safe to eat.
  6. Once the Brussels sprouts are cooked to your liking (I dig them tender-crisp), take the pan off the heat and stir in several spoonfuls of the mustard vinaigrette, tasting often and adjusting for salt if it needs it. Plop a pile on a plate, lean a pork chop up against them, and drizzle the gastrique around it.

Remix the dish: Use this same technique to turn strawberries, cherries, peaches, blackberries, or raspberries into a syrup. Mix them into cocktails, drizzle over ice cream, or eat with pancakes, french toast, or biscuits.

If you wanted to go real fancy with the sauce, treat it like a pan sauce  and simmer it in a frying pan with shallots, garlic, herbs, and some butter. I just wasn’t into putting that much effort into it that night.

If you’re strapped for time and just want something sweet, fruity, and tangy for a dish, throw a few big scoops of good jam into a frying pan, thin with water, and heat with a dash of salt and some dried herbs/garlic powder. Poor man’s sauce!