Grilled Pork Chops with Mustard Brussels Sprouts and Blueberry Gastrique

I kinda stumbled into this dish. I’ve been traveling and didn’t want a bag of blueberries I got in my farm bag to go to waste, so I started out making them into a syrup I could freeze and use for cocktails, desserts, or pancakes down the road. After I had it jarred and ready to go, I realized how awesome it would taste with the dinner I had whipped up. Boom roasted, an okay dinner into a clutch one with a simple good idea.

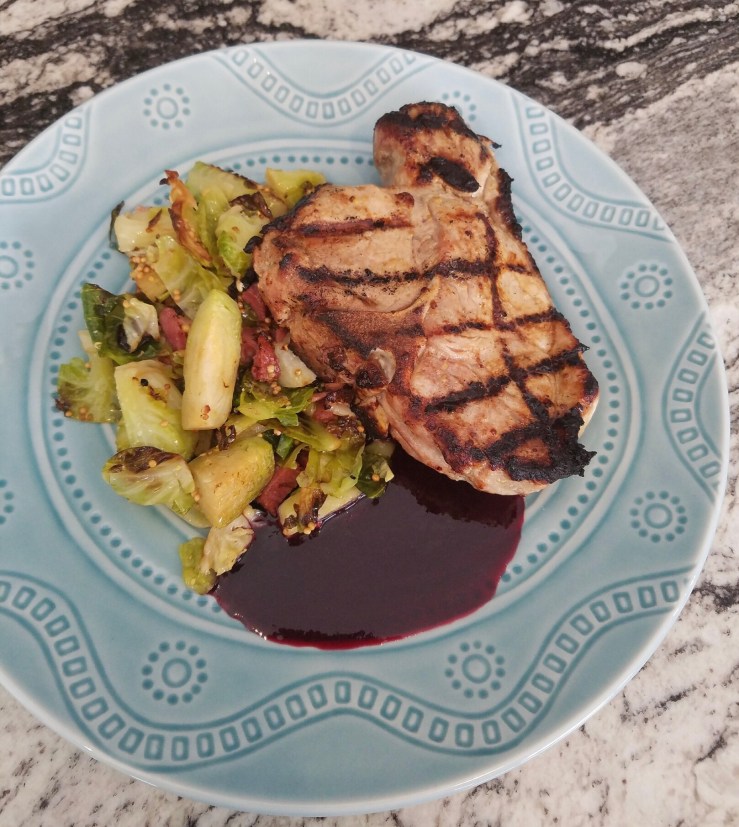
A gastrique is basically just a sweet and sour fruit sauce. This version is pretty basic (just a weeknight dinner) but you can fancy up the sauce with garlic, shallots, and herbs if you’re feeling it. The tangy sauce tasted great with the smokey pork chops, and the sweetness complimented the spicy mustard and vegetal Brussels sprouts. For a meal on the fly, it turned out super balanced!

You’ll Need:

  • Pork chops, thick cut
  • kosher salt
  • pepper
  • 4 tablespoons of course grain dijon mustard
  • 6 tablespoons of olive oil, plus some
  • 1 tablespoon of honey
  • 1 tablespoon of vinegar (red wine vinegar is my default, but apple cider or even white would do in a pinch)
  • A pint or so of blueberries
  • 3/4 cup or so of sugar
  • Lemon juice (the vinegar you used earlier would be fine if you don’t have a lemon)
  • Brussels sprouts (eyeball it…I used like 8 big ones for 2 portion sizes and still had some leftover)
  • Smoked turkey leg (crumbled bacon would be ideal, I just didn’t have any at the time. Or leave this out, totally not a necessary component. You can find these at most grocery stores near the bacon and sausage. They’re super cheap too!)

Method

  1. In a jar, shake together the mustard, olive oil, honey, and a pinch of salt. Salt and pepper both sides of your pork chops, and pour some of the dressing on top of the pork chops to marinade. You don’t need a ton, but enough so that all surfaces of the pork chops receive some lovin’. Leave on a plate to soak in the flavors while you work on the rest of the meal. Add the vinegar to the unused dressing and shake to combine. Set aside.
  2. Throw the berries and half a cup of water, and the sugar into a sauce pan. Bring to a boil, then use a potato masher to break up the berries and release their juices. Add a squeeze of lemon and a pinch of salt, then taste, taste, taste. Does it need more tang? Add more lemon. Is it too cloyingly sweet? Add another pinch of salt. Too thick? Splash in some water. If you’re feeling adventurous, add some fresh thyme or rosemary! Let bubble and thicken on low for 10-15 minutes, checking often to make sure you like the taste and consistency. If you want your fruit sauce chunky, use it as is. If you want it more homogeneous, toss into a blender. If you’re just nuts like I am, blend then pour it through a fine-mesh strainer. This will keep well in the fridge for a week or pretty much forever in the freezer.
  3. Trim the stalky bottom of the Brussels sprouts off and cut into quarters. Use a small knife and your hands to strip the meat the smoked turkey leg, and roughly chop the meat. You’ll have a ton extra, which I like to throw in a jar and freeze to use on other occasions such as this. I also freeze the leftover bone to make stock from, but I also realize that I’m kinda insane. Hashtag nose to tail.
  4. Turn your grill on medium high heat. While the grill is heating up, drizzle the bottom of a frying pan with some olive oil over medium heat and saute the Brussels, making sure they get some nice caramelization on them before stirring around so their opposite sides get some color. After a few minutes, toss in a handful of the smoked turkey.
  5.  Grill the pork chops 2-3 minutes on each side for some clutch grill marks, then move to indirect heat until they’re finished. Be sure to cut into one and check before serving…the only thing worse than overcooked pork is undercooked pork. If you’re using a termometer (you should) I like my pig around 155 degrees, but apparently new studied say 145 is safe to eat.
  6. Once the Brussels sprouts are cooked to your liking (I dig them tender-crisp), take the pan off the heat and stir in several spoonfuls of the mustard vinaigrette, tasting often and adjusting for salt if it needs it. Plop a pile on a plate, lean a pork chop up against them, and drizzle the gastrique around it.

Remix the dish: Use this same technique to turn strawberries, cherries, peaches, blackberries, or raspberries into a syrup. Mix them into cocktails, drizzle over ice cream, or eat with pancakes, french toast, or biscuits.

If you wanted to go real fancy with the sauce, treat it like a pan sauce  and simmer it in a frying pan with shallots, garlic, herbs, and some butter. I just wasn’t into putting that much effort into it that night.

If you’re strapped for time and just want something sweet, fruity, and tangy for a dish, throw a few big scoops of good jam into a frying pan, thin with water, and heat with a dash of salt and some dried herbs/garlic powder. Poor man’s sauce!

The one where we talk about Roasted Chicken and Pan Sauce


There’s such beauty in the simplicity of a great roasted chicken breasts, hugged by a sauce generated from its own comforting flavors. (Ugh I think that was the most Pioneer Woman-esque sentence I’ve ever written). That being said…for a simple dish, there are a lot of steps needed to bang this out and a handful of places where it can all go wrong. Don’t worry though, ya girl Chelsea’s here to troubleshoot for you. Here’s the four main things to keep in mind:

  • The Cut. This recipe is not for boring and deceptively expensive boneless skinless breasts. Chicken thighs and legs are delicious, but for another post. You need skin-on split breasts for this–don’t worry, I’ll show you how to de-bone them.
  • Get A Thermometer Already! Your chicken, steaks, pork chops, everything you sear, grill, or roast will never taste good until you shell out the whole $15 for an oven-safe thermometer on a wire, so you can check the temperature without having to constantly open and close the oven. Plus you can set an alarm, so you’ll know the very second your meat comes to temperature. One of the most important tools you can have! It’s the trick to having perfectly done, moist meat.
  • The Pan Sauce. Yup, that mystical and delicious thang. I’ll be honest, even with a little help from my buddies gelatin and cornstarch (thanks Kenji!) it still sometimes doesn’t thicken up the way I want it to.  If I were REALLY looking for a viscous gravy I could take a roux thickening approach, but that will yield a really heavy sauce. Unless you’re serving mashed potatoes it’s really unnecessary. Your pan sauce will still pack an awesome punch of flavor even if it doesn’t turn into a restaurant-like syrupy glaze.
  • Time. Because there’s butchery and chopping of vegetation involved, plan for about 45 mins to an hour for this to all come together. Good things can’t be rushed!

You’ll Need

  • Skin on split chicken breasts, one per person
  • Kosher salt and several grinds of pepper
  • Olive oil
  • A small shallot
  • A clove of garlic
  • 1/2 a cup of white wine
  • 1/2 a cup of chicken broth
  • 1 packet of gelatin (optional but helpful)
  • 2 tablespoons of butter
  • A little cornstarch
  • Soy sauce (trust)
  • Honey 
  • 2-3 tablespoons of fresh herbs, whatever is at hand (parsley, chives, tarragon, dill, or rosemary)

The Method

  1. Set the oven for 425 degrees F. Pour the chicken broth into a cup with the gelatin, whisking together with a fork. It’ll need some time to gently re-hydrate. Chop the shallots, garlic, and herbs.
  2. Nextt we’ve got to de-bone the chicken. Basically, you’re going to make a diagonal slice through the chicken, as close to the bones as possible, in fluid strokes so the portion doesn’t get all hacked up. Hold the sharpest knife you have with your dominant hand, and wrap the other hand in a towel, using it to stabilize the meat. Go slowly, separating the breast and the bones like a book. When you’re almost all the way through, your knife will hit a small rogue bone–use small controlled cuts to gently remove it. Now you’ve got yourself a skin on chicken breast, just like the restaurants! Okay not like the restaurants, if this is your first time doing this is probably looks like an uneven piece of crap. It gets wayyyy easier with practice, you’ll be an expert in no time. Flip the chicken over, there will be a distinctive “loose” section. That would be the chicken tender. Pull that off and throw in a plastic bag in the fridge to cook later in the week. Coincidentally, it should make your chicken portion more even! Even meat = even cooking. Check out this link for more in-depth instructions.
  3. Toss a few good glugs of olive oil in an oven-safe frying pan and set it over medium heat. Salt and pepper both sides of your newly butchered chicken breasts and put them in the pan, skin side down. Fry until the skin is golden and crisp, about 5-6 minutes. You’ll know when it’s ready because the chicken will release easily from the pan, not sticking at all. Monitor this stage carefully–you want golden chicken skin, not burned! Flip the chicken over, insert your thermometer into the center of the thickest part of one of the breasts, then cook until the thermometer hits 158 degrees F. Remove from the oven and set on a plate or a cutting board to rest for 10-15 minutes, or however long it takes you to make the pan sauce. The chicken’s temperature will spike another 10 degrees or so as it sits, finishing the chicken then redistributing the juices as it cools. Note: if you’re cooking for a big crowd, you can skip the frying pan part and stick the seasoned chicken skin-side up in a roasting straight into the oven. Broil the last few minutes of cook time to get that crunchy, golden brown skin. The pan sauce will turn out a little less chicken-y, but that’s a small sacrifice if you’re entertaining.
  4. Set the same chicken pan over medium heat with some olive oil and whatever is left in the pan (all that juice, chicken fat, and browned bits are a flavor goldmine!). Keep an oven mitt handy for adjusting the pan–the handle will be super hot! Sauté the shallot in the pan for 8 minutes, adding the garlic for the last 2. Add the wine, and use a wooden spoon or a whisk to scrape up all the browned bits from the bottom of the pan. (PS, this is called deglazing!!). Add the gelatin-y broth, crank up heat to medium high, and let the liquid bubble and reduce by about half.
  5. Drop the butter into a small bowl of cornstarch so it’s nice and coated with it, then add to the pan sauce along with a splash of soy sauce (umami bomb!) and a little drizzle of honey. Let the cold butter bubble with the sauce, at a hard boil for at least 30 seconds. Cut the heat, then add the chopped herbs, stirring constantly. This sauce will thicken like whoa as it sits, so slice up the chicken and serve soon after you finish. This would be clutch with roasted potatoes, roasted veggies, and a simple salad on the side. Pan sauce love for all!

Remix The Dish: this is the recipe for a classic and simple pan sauce, but there’s a million ways to tweak it depending on what flavor you’re going after. Try adding in Dijon mustard, orange marmalade, blackberry or cherry preserves, red wine, maple syrup, or vinegar. Taste and taste again to identify what’s missing, and use your brain and your pantry to tweak it until it tastes the way you want it to.


Also: here’s a funny little Snapchat video of me making this. The production value is just outstanding.